Sunday, April 3, 2016

Life Happens When You're Building an Airplane

I know, I know, I haven't updated this blog in forever. But I had a few life events that I had to deal with, but now I'm back. New house, new work space, new life with the same dream of building my own airplane. Without further ado...

I saw where one flying CX4 had issues with the design of the attach points for the tail wheel spring at bulkheads F11 & F12, so I decided to reinforce mine now. Here are a few photos of my redesign:


I think I have beefed up bulkhead F11 to the point that it will not crack as seen in the original design. However, I think the weak link is now the 3/16" angle where the bolt attaches. It will certainly be on my annual inspection list. If I was starting from scratch, I might use a 1/4" angle. The spacer is a large aluminum cable ferrule I found at the hardware store. I had to drill the hole out to accept the AN6 bolt.
 
I used to do some screen printing and had asked my squeegee manufacture for some samples of squeegee material many years ago and I had these samples lying around and they just seemed like a good solution to help cushion the rear portion of the tail spring.  My tech counselor thought so as well. Sorry, but I'm not sure where the rest of you would purchase this material.
 
I have been working on my firewall forward & wiring, so that may be my next post. I'm certainly glad I have this project to create a distraction from life's little challenges!

Tuesday, September 16, 2014

Seat Belt Shoulder Harness Installation

It's been a while since I've posted, but I have been busy building.  In my last post I created the turtle deck and then an access hole, complete with a removable cover.  I was walking by my project one day and did a double take. At that moment, I realized I had forgotten that my should harness was probably going to need to come through the F6 bulkhead right where I made my removable cover. I think I might have muttered something Homer Simpson would say, "D'oh!"

Anyway, I was bound determined to make it work. And I think the results are quite good. The first thing I did was beef up the F10 bulkhead so that I could make it my anchor point for my harness. In the photos below, you can see that I mounted a cable through the beefed up F10 bulkhead. This cable then runs forward to an eye bolt mounted to the upper fuselage skin under the turtle deck so it is hidden from sight.


I added a piece of stainless steel to stiffen the upper skin where the eye bolt is mounted.


My shoulder harness is then attached to this eye bolt. I then sat in the cockpit and figured out where the straps of the harness would exit through the cover by making a cardboard replica of my cover.


I like how everything turned out.
 
I have also been working on my vertical fin.  I have all the pieces made and I will begin assembling them soon.


Friday, March 14, 2014

Turtle Deck Installation

I've been busy the last few weekends creating and installing my turtle deck, complete with an access door.
 

Click on image to enlarge
 
I first started by making the turtle deck out of construction paper.  The CX5's new turtle deck is shaped something like what you see in the photo above, but I decided I didn't like this shape. I think I made a total of three out of cardboard before I got the shape I liked.


I settled on this shape.  I let the front over lap the F7 flange so that once I had the metal where I wanted it on the rear and all the holes drilled, I could simply trim down the front edge.
 
 
I clamped a couple of 2x4's to the F7 bulkhead so I could keep any twist out of it while I drilled the first few holes.  I measured & drilled #40 holes in the F7 flange and used a hole finder to drill matching holes in the turtle deck skin. This way the holes were exactly where I wanted them.  The only issue that came up was that when I removed the hole finder and laid the skin down tight against the F7 flange, I saw that the holes were slightly misaligned because of the thickness in the hole finder itself.  So, before drilling the next hole I would immediately drill out the hole I just drilled with a #30 drill and put in a cleco so that the next hole was not off even more. This procedure worked well.
 
I would drill a few holes at the F7 flange and then lay everything down flat and drill a hole near the rear where the turtle deck skin met the fuselage skin.  I would work my way forward.  I had these rearward holes predrilled where I wanted them to go.


This process seem to work well.  I orginally had holes in the rear skin every 6 inches and thought I might get away with this kind of spacing.  Upon a closer inspection I saw some slight puckering in between the clecos and I then added additional holes so that my spacing ended up at 3 inches.  I originally only had 3 rivet holes in the rear but added 2 more for the same reason.
 
Next was to create an access hole in F7 so I could store something in the turtle deck area if I wanted to.
 
 
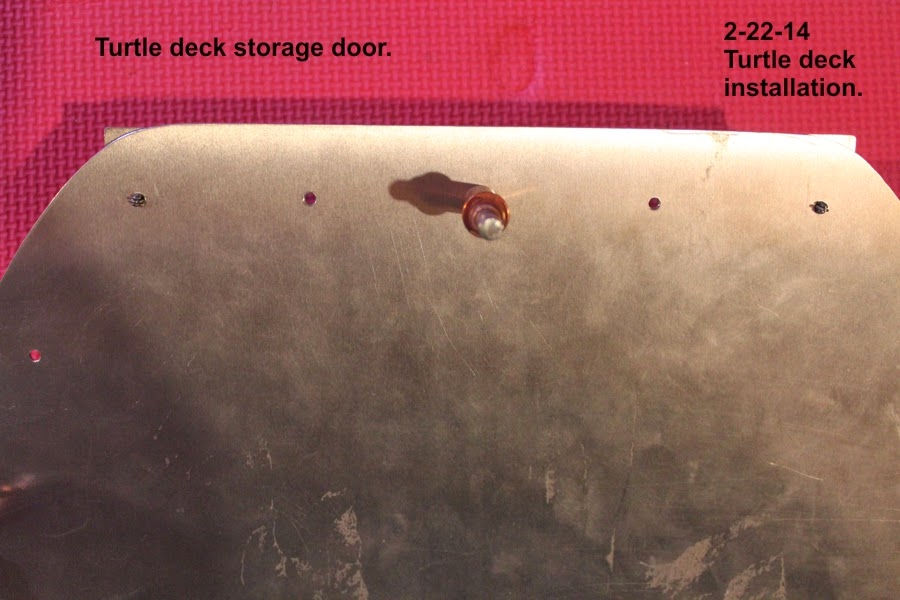
I cut a hole to a pleasing shape and positioned it such that there is about a 3/4" lip at the bottom.  This was important to how I was going to secure my door.
 
 
I then cut a piece of .032 material in the same shape as the hole, but I oversized it by about 3/4 of an inch so that it would completely cover the hole and become the door. I then cut a 2nd piece the same size as the access hole and centered it on the back side of this door. Then I attached two rectangular pieces at the top and bottom of the rear as shown it the photos below.


The center piece was trimmed at the top about 1/4" so I could slide the door upward in the hole allowing the lower rectangle to clear the lower F7 hole lip. Then a slight downward slide is made to engage the lower rectangle and the door is held in place.
 
 
I bent the lower corners of the door ever so slightly so that the corners fit snugly when the door is on. In the photo above you can see this slight bend at the lower left corner.  I will eventually mount a head cushion on this door.
 
As always, there are more photos in my album that you can find in the right hand column of this blog.
 
Next I should be making tail feathers! Stay tuned!


Wednesday, February 12, 2014

Horizontal Stabilizer & Wheel Pants


With some help from my friend and RV7 builder Bob Cartwright, I aligned my horizontal stabilizer and drilled the four mounting holes and installed nut plates for these bolts.
 
To keep busy I installed my wheel pants.


As soon as the weather warms up a bit I will start skinning the horizontal stabilizer.

Sunday, December 8, 2013

Throttle & Trim Controls

I have been working on creating my throttle lever, pitch trim control and installing push-pull cables for the choke, carb heat and cabin heat. First, some photos of my throttle lever:

Click on images to enlarge 


I calculated where I should attached the Bowden cable to the throttle lever using some software trying to find the location that would give me just the right amount of cable travel. I might have over thought this, as I will not know if I got it right until I mount the carb and hook up the throttle cable to it. However, it would be easy to move the attachment hole or remake the lever if need be. I think I will also add a camp on the Bowden cable sleeve on the rear side of bulkhead F5 as I'm seeing some cable flex I wish to eliminate.
 
 
Next, I worked on creating a pitch trim control. I had seen a photo of someone else's control which was different from the plans control, so I set out to make mine similar to what I had seen.  Here are a few photos of what I came up with:


I searched the hardware store until I came upon the terminal lug pictured above. I found it in the electrical department. It worked perfectly for what I wanted to do. I put a screw through the mounting hole and secured it with a nut. I found a twist knob at the hardware store with female threads to match the previously mentioned screw. (Actually, I found the knob first and then the screw.) I needed to cover my slot so things didn't fall through it and asked my wife what item had enough plastic to cover the slot. Within seconds she answered, "A cooking spatula". Well, I found one at the grocery store and cut it down to fit my needs. I now can use this as an example of how I DO listen to my wife on occasion. A metal washer under the spatula strip gives additional strength.
 
I made my armrest top out of .020" aluminum. It should be fine, but If I was starting over, I would use .032" on this particular armrest. I can always make a replacement armrest top if this one doesn't hold up well from the sliding action of the control knob. Or I could reinforce it with a strip of .032" flush riveted to the underside.
 
If it's not obvious, you loosen the knob and slide it forward or aft to adjust your trim and then tighten the knob again.
 
NOTE: I will have to reverse the attach point at the elevator so that nose down is adjusted by sliding the knob forward.  This shouldn't be a big deal. If you are going to use this control, work this out in your mind before committing to it. Dave's plans built lever pushes the cable rearward when you push the lever forward. My control pulls the cable forward when the knob goes forward. (Your manual comes with a page of two photos with a heading of "Elevator trim tab rigging", but has no page number. The upper photo shows the Bowden cable attach tab pointing down. Mine will point up.)


Wednesday, November 20, 2013

Always something to do!

OK, so I was working on the horizontal stabilizer until I needed help with aligning the spar with the fuselage to drill some important holes. I wanted a particular friend to help, but he was busy. So, I put that project aside and began working on the interior armrests and panels.  Here are a few photos:

Click on photos to enlarge


There are more photos in my photo album on the right side of this page. Next I have to create the throttle and pitch trim controls.
 

Thursday, October 24, 2013

Building up my Horizontal Stabilizer

Here are some photos of my horizontal stabilizer spar work. Trying to find the time to continue work has been a challenge, but we'll persevere.